Showing posts with label VBA / Macro. Show all posts

Thursday, June 12, 2014

VBA - Input Box

Thank you readers for encouraging my posts on Excel. With this post, this blog now has 100 posts and many more to go. Let's spread the knowledge. Cheers!!!!

We saw about MsgBox in one of our previous posts. MsgBox is used to alert user with some information. We can also provide some buttons such as Yes, No, Retry etc for the user to click. According to user response, we can continue with next steps of macro.

In some cases, it might not be enough to just get user click a button. You may have to solicit some information from the user for further action. For example: you may have to get a name from the user and use that name in a subsequent procedure. MsgBox function falls short here as it can only offer buttons to click.

In such cases, InputBox function is your friend. This function is similar to MsgBox with an additional functionality to solicit input from user. InputBox function displays a prompt in a dialog box, waits for the user to input text or click a button, and returns a string containing the contents of the text box.

InputBox syntax
InputBox(prompt[, title] [, default] [, xpos] [, ypos] [, helpfile, context])
InputBox: This is the key word to call Input Box

Prompt: Mandatory. Whatever you enter in this argument will be displayed to the user. If you are entering a string in prompt, you will have to enclose that string with double quotes. You can also pass one of the variable values as an argument for this. Do you remember the line we used in variables post?

Title: Optional. This is the text shown on top of the input box. If omitted, “Microsoft Excel” will be shown.

Default: Optional. This is shown as default value in the InputBox.

Xpos: Optional. This is a number that specifies the horizontal distance of the left edge of the dialog box from the left edge of the screen. If xpos is omitted, the dialog box is horizontally centred.

Ypos: Optional. This is a number that specifies, the vertical distance of the upper edge of the dialog box from the top of the screen. If ypos is omitted, the dialog box is vertically positioned approximately one-third of the way down the screen.

Helpfile: Optional. If you notice, the alert produced by Excel will have either a help button or a question mark button on the alert. Those are to display a help file that is saved with the program. If you have a help file created for your box, you can provide that here. But creating a help file deserves multiple separate posts but that’s not our concerns at this point of time. You can conveniently ignore this.

Context: Optional. It is the number of the topic to be displayed from helpfile. If this is provided, helpfile is mandatory (quite obvious)

Notes:
  • It is mandatory to assign the InputBox function to a variable if you are using more than one argument.
  • If you want to omit any argument and move to next one, you should include a comma.
Let’s see the InputBox in action with few examples.
Example 1: Display a message to the user asking to enter a number between 1 and 10.
Sub Test()
InputBox ("Hello, please enter a number between 1 and 10")
End Sub
Executing the code above will display a dialogue like below.


In the bottom of the above box, user can enter anything and / or click OK or Cancel buttons. We will see how to work with user response shortly.

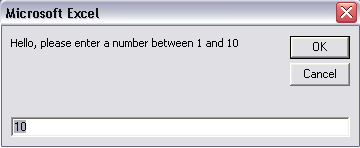
Example 2: Display a message to the user asking to enter a number between 1 and 10. With number 10 entered already in the box that will be displayed.
Sub Test()
Dim MyInput As String
MyInput = InputBox("Hello, please enter a number between 1 and 10", , 10)
End Sub
Notice the code: Since I am using more than one argument, I am declaring a variable MyInput and assigned InputBox to that variable. And I used a comma to skip second argument. As third argument, I entered number 10 which is what I wanted in the box by default.

Executing code above will display below box.


Number 10 pre-entered in the box will help user if that is what commonly used. It reduces few key presses from the user. If user wants to enter a different number, he can delete existing and enter whatever he wants.

When the user clicks OK button, whatever is entered in the box will be assigned to the variable. If Cancel button is clicked then our variable get a null string (empty or nothing is represented by “” i.e. two double quotes with nothing in-between)

Problem with InputBox is that you cannot define the buttons you need. OK and Cancel buttons are always displayed.

Work With User Response

InputBox returns user entry as a text string. Using this string; you can further write code that uses it. Let’s extend our example code above to show the user entered value back to him in an MsgBox for confirmation.
Sub Test()
Dim MyInput As String
MyInput = InputBox("Hello, please enter a number between 1 and 10", , 10)
If MyInput = "" Then 'User didn't enter anything or clicked cancel
    MsgBox ("You entered nothing")
Else 'Ok. something is entered
    MsgBox ("You entered" & MyInput & vbCrLf & "Click OK to Proceed")
End If
End Sub
Running above code displays an input box first (refer to above picture). Based on user action, there will be subsequent message boxes.

If user clicked Cancel button or didn’t not enter anything and clicked on OK button, below message is displayed.


If user entered something (not necessarily a number between 1 and 10) and clicked on OK button, below message is displayed. (Of course, with whatever user entered in place of 10)


As mentioned above, InputBox returns anything entered in it as a string i.e. as text. Even if you enter a number 10 as above, you cannot use it in subsequent calculations as a number. If you are sure that only number is entered, multiply the string with 1 in your code. That would force the number in string to be identified as a number.

Sub Test()
MyInput = InputBox("Hello, please enter a number between 1 and 10", , 10) * 1
End Sub
But remember, above code will result into an error if what is entered in the InputBox is not a number.


MsgBox & InputBox are the two basic dialogues used to solicit user’s response. Both have their own limitations, for example in InputBox, you cannot restrict the user to enter only a number. You cannot customize appearance of these boxes etc.

But there are alternatives. If you are looking to restrict what user enters, you can use Application.InputBox (note that what we saw above is a plain InputBox. With Application qualifier, a different function is called altogether). We will see about this in our next post.

You can make your own designed message boxes and input boxes using UserForms. We will see about them eventually. Till then, explore what we discussed on this series till now. Cheerio!!!

Thursday, April 24, 2014

VBA - Error Trapping


When an error occurs while executing the code, VBA treats that error as fatal and stops executing the code then and there, with an error alert message to the user. While at times this is what you may want, most of the times you will just have to continue running the code and do other jobs that macro was supposed to do. For this, we have to use what is called an Error Trapping. VBA provides ways to tackle with that error without interrupting the code. Let’s see what options we have to do that.

On Error Statement

This statement enables error-handling routine and you can specify from where the code should continue executing. We have 3 options to provide such location.

On Error Resume Next

This tells VBA to ignore the error and continue running the code from immediate next line of code following the line where the error occurred.

This error handler will be active through out your code. No matter how many times errors occurr in your procedure, VBA always executes the next line. But be careful, with this line, VBA ignores any kind of error. If you don’t take care, it may result into ignoring few errors that should not be ignored.

On Error GoTo line

This enables the error-handling routine to start at the line specified in the argument. The line argument is any line label or line number. The specified line must be in the same procedure as the On Error statement; otherwise, a compile-time error occurs.

Note that, on first occurrence of first error, VBA starts executing the code from line given as argument and continues executing the lines below it till the End Sub.

Once executed, error handler will be disabled for further use. That means, On Error GoTo statment can be used for only one error in a procedure.

On Error GoTo 0

Disables any error handler that is in the current procedure!

Let's see the error handling through an example. We will deliberately do something that causes an error. How about try to enter some value in a protected sheet and that will cause an error? Copy/Paste the below code to your module! Protect the active sheet. Click anywhere on the code in VBA and press F8 repeatedly to run the macro line by line. On each press of F8, you can notice where the focus is going.

Example –On Error Resume Next
Sub Test()
On Error Resume Next 'Defining the error trapping, on error focus should go to next line
ActiveCell.Value = 1000 'try to enter some random value in active cell
If Err.Number <> 0 Then 'check if error occurred?
    MsgBox ("Error Occurred") 'Yes? then message box saying so
Else
    MsgBox ("Done") 'No? Then all done.
End If
End Sub
Run this code by repeatedly pressing F8. Now you see that no matter what, focus will always go to the next line. We are trapping the error by If-Then-Else-End If statements.

Example –On Error Goto line
Sub Test()
On Error GoTo ErrorHandler 'Defining the error trapping, focus should go to a line named ErrorHandler below
ActiveCell.Value = 1000 'try to enter some random value in active cell
Exit Sub 'If no error, procedure should stop here
ErrorHandler: MsgBox ("Sorry, Error " & Err.Number & " Occurred") 'This line contains what to do in case of error
End Sub
If you noticed, from ActiveCell.Value = 1000 line, focus will change to ErrorHandler, as there will be an error when executing that line and we asked VBA to go to ErrorHandler on error occurrence. On one more press F8, a message box is shown informing the error number to the user.

Err Object

Wherever there is an error, VBA keeps that error information in Err object. You can use this information to know more about the type of error. You can in turn display the information to the user as we did in our earlier code. Err.Number provides the system assigned number of this error. There is also Err.Description will provide the description of the error. See other options available under Err object and explore.

VBA - If Then Else Endif


Do you remember the Excel built-in function IF? You can provide a condition to be evaluated by IF and provide a calculation / value if result is TRUE and provide a different calculation / value if result is FALSE. In similar lines, VBA also provides a feature i.e.. IF statement. Syntax for this is as below.

Form 1 – In One Line – Without Else Condition

If condition Then statement

If: is the key word to call this feature
Condition: what do you want to evaluate. You can give one or more conditions to evaluate (we will see how)
Statement: what if condition is met.
We are not defining what to do if condition is not met so macro will do nothing (moves to next available line of code).

Example: If ActiveCell.Value = 5 Then MsgBox(ActiveCell.Value)

This form is best used if you just want to evaluate one condition followed by single line action if condition is true. No action if condition is false.

Form 2 – In One Line - With Else Condition

If condition Then statement [Else elsestatement]

Other key words are similar as above form.
Elsestatement: What if condition is not met

Example: If ActiveCell.Value = 5 Then MsgBox(ActiveCell.Value) Else MsgBox(“No Match”)

This form is best used if you just want to evaluate one condition followed by single action if condition is true and a single line action if condition is false.

Form 3 – Multiple Lines - Without Else Condition

If condition Then
statement
Endif

Example:
If ActiveCell.Value = 5 Then
    MsgBox(ActiveCell.Value)
End If
Form 4 – Multiple Lines – With Else Condition

If condition Then
statement
Else
elsestatement
End If

Example:
If ActiveCell.Value = 5 Then
     MsgBox(ActiveCell.Value)
Else
     MsgBox(“No Match”)
End If
Form 5 – Multiple Lines - Multiple Else conditions
If condition Then
     statement
Elseif condition Then
     Elsestatement
Elseif condition Then
     Elsestatement
……………………….
Else
statement
End If
Example:
If ActiveCell.Value = 5 Then
      MsgBox(ActiveCell.Value)
Elseif ActiveCell.Value = 4 Then
      MsgBox(Application.UserName)
Elseif ActiveCell.Value = 3 Then
      MsgBox(“Welcome To The World”)
Else
      MsgBox(“Bye Guys”)
End If
Above examples are pretty much self explanatory. Copy them to a VBA module, enter a value in a cell and execute the macro. We will use many If Then Else statements in our forth coming macros. Stay tuned!!

Thursday, April 3, 2014

Message Box - After User Response


We saw about MsgBox in our previous post and now we know how to display this box to user with various option buttons and text formats. Now let’s see few other scenarios and continue with how we can capture user response to proceed with next steps.

Your prompt in the box can be approximately 1024 characters (more or less depending on characters you use). Your message box size will automatically adjust to the prompt length and text will also be wrapped automatically to go to next line. But what if you want to enter more than one line, breaking at where you want instead of waiting VBA to wrap it?

Simple! You can use a carriage return i.e. Chr(13) or line feed i.e. Chr(10) or both together. You can simply use a VBA built-in constant vbCrLf (my choice) too to get this done.

Observe the below code and screenshots. First one is using vbCrLf and second one without it. See that I am using this constant with two concatenation operator (&) to join two lines. Also code should be in one line, it may appear split into 2 lines according to your browser settings)
Sub Test()
MyMsg = MsgBox("Macro finished execution!!!!" & vbCrLf & "Do you want to proceed???", vbYesNo)
End Sub

Sub Test()
MyMsg = MsgBox("Macro finished execution!!!! Do you want to proceed???", vbYesNo)
End Sub

Note: You cannot easily change the font and button placement in these message boxes. Best alternative is to create your own message box using UserForms rather than using standard. Eventually, we will see about that.

Another Example Using Variables

We saw about variables in one of the previous posts, so I thought it will be ideal to show one example of message box using them. Consider this one as bonus.
Sub Test()
Dim PromptMsg, ButtonStyle, MyTitle, MyString
PromptMsg = "Do you want to continue ?"    ' Define your prompt
ButtonStyle = vbYesNo + vbCritical + vbDefaultButton2    ' Define buttons.
MyTitle = "Provide a response"    ' Define title.
Response = MsgBox(PromptMsg, ButtonStyle, MyTitle) 'Show the box
End Sub

Post User Response

Ok. We displayed a nice and cozy message box to the user and he/she clicked on a button. What to do next? Macro pauses till the time this message box is displayed to user. When the user clicks on a button in the box, next line of the code will be executed. We saw that MsgBox returns a value based on the options selected by the user. We will use that to perform next actions. For your ready reference, I am again producing the possible values returned by MsgBox here.


We will extend the above example further to do something. Add the below code just before End Sub in earlier code. I made vbYes bold in below code to catch your eyes; however VBA wouldn't show it in bold. Instead of vbYes, you can also use a number 6 (above table) and so on.

If Response = vbYes Then 'Checking if user clicked Yes
    MsgBox ("You clicked yes") 'Write what you want to do if user clicked yes
Else
    MsgBox ("You clicked no") 'If Yes is not clicked, that means No is clicked, write what you want to do here
End If
We are using If-Then-Else-End If statements to see what the user's response is and displaying another message box for each option (Yes or No) as in below pictures.

User clicked no
User clicked yes
That’s all I wanted to say about MsgBox. Let me know if anything is unclear about this. Happy Learning!!

Message Box - Introduction & Examples


Welcome to another post on VBA coding. In earlier post, we saw about variables. Now, we will see about message box which is another useful functionality to display messages to users. When I started digging in VBA, I used lot of message boxes to pause macro and see the status. Let’s see what a message box is and how to work with it.

A message box is a way that you can display some information to user or make the macro interactive. When you display a message box, a message is displayed to the user, macro will wait for user to click a button on the box and proceed. You will call the message box by following its syntax; just remember any of the Excel built-in functions we discussed already. Message box syntax is like below.
MsgBox (prompt[, buttons] [, title] [, helpfile, context])
Msgbox: This is the key word to get message box displayed.

Prompt: Mandatory. Whatever you enter in this argument will be displayed to the user. If you are entering a string in prompt, you will have to enclose that string with double quotes. You can also pass one of the variable value as an argument for this. Do you remember the line we used in variables post?
MsgBox ("You are signed in as " & UserName)

Buttons: Optional. If left omitted, your message box contains only one button which is OK (look at the above message). Options available for buttons are;


You can use more than one non-conflicting option in single message by adding them with a plus (+) sign. For example: if you want to have Yes, No & Cancel buttons (vbYesNoCancel) with Cancel as default button (vbDefaultButton3), you can write your code like below.
MyMsg = MsgBox("Do you want to proceed???", vbYesNoCancel + vbDefaultButton3)
You can use Value that is represented by the constant instead of constant itself. So for the above code, you can also write:
MyMsg = MsgBox("Do you want to proceed???", 3 + 512)
Title: Optional. This is the text shown on top of the message box. If omitted, “Microsoft Excel” will be shown.

Helpfile: Optional. If you notice, the alert produced by Excel will have either a help button or a question mark button on the alert. Those are to display a help file that is saved with the program. If you have a help file created for your message box, you can provide that here. But creating a help file deserves multiple separate posts but that’s not in scope for this post. You can conveniently ignore this for now.

Context: Optional. It is the number of the topic to be displayed from helpfile. If this is provided, helpfile is mandatory (quite obvious)

What It Returns

Once the message box is displayed to user, based on the user action, this syntax returns number from 1 to 7. You can proceed with any action using the user’s response. For example: in a box which displays two buttons viz. Yes and No, you can perform a set of actions if user clicks Yes and different actions if user clicks No. Possible return values are given below.


Examples

Let’s see 3 examples to see Msgbox in action. I will just give the code, a screenshot of the alert and simple explanation. Rest is on you to do research.

Example 1 : Show a simple OK button with a message.
Sub Test()
MsgBox ("Macro finished execution")
End Sub

Example 2 : Show two buttons with title (it is mandatory to assign this to a variable)
Sub Test()
MyMsg = MsgBox("Do you want to proceed???", vbYesNo, "Proceed Prompt")
End Sub

Example 3: Message box with a prompt; and 3 buttons viz. Yes, No & Cancel with Cancel highlighted by default and text aligned right side. Message box should be displayed as a warning (yellow triangle with a exclamation mark) Notice, I am using values rather than constants.
Sub Test()
MyMsg = MsgBox("Do you want to proceed???", 3 + 512 + 48 + 524288)
End Sub

We will continue this discussion on another post to see how to capture the user response and work on that. Stay tuned!!

Friday, March 28, 2014

Working With Variables


You will read about Variables a lot while learning VBA and we use them to a very large extent in most of the codes we write. It’s better to know about them before starting real coding. So, let’s see.

Variable is essentially a storage location where you can store data. As the name suggests, this value can be changed during the macro execution. You can literally define any number of variables you need to work in your project but each variable will have to be differently named.

Naming a Variable

There are some rules to follow while naming a variable. Let’s see what they are below.
  • Name length must be within 255 characters
  • Space, Period (dot/full stop), exclamation (!), @, &, $, # cannot be used in the name
  • Should not begin with a number
  • Reserved names cannot be used
  • Names are not case sensitive
  • You cannot duplicate names in the same procedure
Remember our Named Range post? You can relate these rules to them. Few examples of valid names can be: MyName, This_Year, Year1, NewVal etc. Invalid name examples are: My.Name (dot not allowed), This Year (space), 1Year (number at the start), New&Val (& used).

Declare a Variable

If you decide to use a variable in your procedure, you will have to declare that to VBA. This is usually done with a key word Dim.  For example: if I have to use a variable named MyVal, I enter the following line in my code.
Dim MyVal
If you place this line after Sub statement, this variable can be used anywhere in the same macro until End Sub. If you place this at the start of the module code before any Sub statement, you can use this variable throughout all the macros written in that module.

Variables occupy memory to work with. Though VBA is capable of deciding the nature of the variable when it encounters the actual usage of variable in a line of code, it is usually useful to define the data type for which this variable is used. For example: you can define if you are going to use the variable to store a text string or a date or another object etc. Defining this would help VBA to reserve exact memory required and often it saves from risk of storing an unintended value. To define the data type, you will have to enter below line.
Dim MyVal As XX
You have multiple options to use in place of XX. See below to know what those are.


So if you want your variable named MyVal to store a number that is between 0 and 255, you declare it as in below line.
Dim MyVal as Byte
If you or your procedure tries to give a value to variable that is outside of 0 and 255, you will get a run time error. Look at the below picture, I declared variable as byte and tried to set its value to 2556 and executed the code. This is the error I got.


As said earlier, declaring the variable in advance is not mandatory. In the code in above picture, I can straight away enter MyVal = 2556 without declaring the variable. However this causes few problems. If you do not declare the variable and data type, VBA reserves more memory than required. One more problem is that you cannot capture correct data type in the variable. In above example: your intention is not to store any number outside 0 and 255, but if you don’t declare the data type, VBA happily accepts the number 2556. One more problem is related to misspelling. VBA might take any misspelt words as a different variable and your project may produce undesired results. If you want to mandate VBA to ask for declaration of every variable, read about Option Explicit below.

Option Explicit

This is to make sure you declare each variable before using it in the module. Enter Option Explicit at the top of module, before starting of any code with Sub. You can also click on Tools > Options > Editor tab > check or clear Require Variable Declaration.

Declaring Multiple Variables

Many times, you might have to use more than one variable in your module. You can declare all of them in 2 ways as shown below.

Method 1

Dim MyVal As Byte
Dim MyName As String
Dim Cl As Range
Dim SelOpt As Boolean

Method 2

Dim MyVal As Byte, Dim MyName As String, Dim Cl As Range, Dim SelOpt As Boolean

Finishing Touch

Once you declare variables, you can start using them to store values so that they can used somewhere else in your code. For example, copy the below code in to a VBE window and press F5.
Sub Test()
Dim UserName As String 'Declaring variable
UserName = Application.UserName 'Passing value to variable
MsgBox ("You are signed in as " & UserName) 'Using variable in another action
End Sub
Running this code on my system will show me a dialogue box as show below.


Different Colours Used in VBA Window


VBA highlights text in different colours in different situations. Understanding what they mean would help much. Let’s see about that in this post.

Font Highlighted in Black

All is well here. All text that is in black colour is normal code that will be executed by VBA.


Font Highlighted in Red

If entire line of code font is highlighted in red, that means there is a syntax error. Syntax error occurs because of various reasons. Example: can be a misspelt keyword or argument.


Font highlighted in Green

Comment text is highlighted in green. See if there is an apostrophe (‘) from where the text is appearing green. Comments are used to elaborate what the code means or generally to give more information. VBA will not execute comments.


Background highlighted in Grey

Grey highlighted text as shown in below picture means you selected that text. It’s ready to be cut, copied or moved to other location.


Background highlighted in Yellow

This means highlighted line is the execution point. This is the line that will be executed when you proceed further. An arrow mark will be placed in the left hand side of that line. Often  you can see this when you press F8 in the macro.


Background highlighted in Maroon

This means highlighted line is the break point. When you run your code, execution will automatically stop at this line. You can place breakpoint or remove at any line of the code by pressing F9 key placing cursor on that line. A maroon colour circle will also be placed to the left of the code along with highlighting.


Font Highlighted in Blue

If you use any key word that is part of VBA build in statements, functions; that word will be highlighted with blue. Notice colour of With qualifier below. (May be difficult to see here, you may type the same statement in your VBA and notice)


Turquoise Colour Box in the Left

This box refers a bookmark. Bookmarks are used to return to that line of code quickly from anywhere at a later point of time.


Green Arrow in the Left

This is called Call Return Text. When you have a series of macros called from one another and stop the code at a break point, this arrow indicates from where the code will start running when the code is resumed.


Follow this example to see how this works. Copy and paste below code in your module.
Sub Test()
Call Test1
End Sub
Sub Test1()
Call Test2
End Sub
Sub Test2()
Call Test3
End Sub
Sub Test3()
ActiveCell.Select
End Sub
Select ActiveCell.Select line and press F9. This should add a break point on that line (maroon colour highlight). Now click on Sub Test () line and press F5, when the maroon line turns yellow (execution point), press Ctrl+L. This would show a box called Call Stack. Double click anything in the list other than first item. You should be able to see the green arrow in the module that calls your double clicked module. Bit confusing but this is a great debugging tool. You might not be using it if you are not really deep in developing. I myself haven’t used it yet.

All these colours are by default applied by VBA; however you have option to choose other colours you fancy. Click on Tools > Options > Editor Format tab. Under Code Colors, click on any item and you can change the font, size, foreground, background & indicator colour of that item. Enjoy!!!

VBA - Best Practices To Follow While Coding


Hello!!

I hope you remember our posts on VBA so far. In earlier posts, we have recorded macros & analysed the code behind them. Today, we are going to see few good practises that saves your time and make the code efficient. Let’s dig into them.

Indentation

Did you notice the code saved by Excel when it records a macro? For example, notice our MyFirstMacro code. You can see how various lines of code under With qualifier are indented.
With Selection.Borders(xlEdgeLeft)

        .LineStyle = xlContinuous

        .ColorIndex = 0
        .TintAndShade = 0
        .Weight = xlThin
End With
You, while writing code should ideally follow this. Excel wouldn't complain if you don’t, but your code looks cool and tidy. If you have multiple With qualifiers or If statements, keeping track of where a qualifier is starting and where it is ending will become difficult without indentation. Look at the code snippet below.
Sub Test()
    If ActiveSheet.Name = "Sheet1" Then
        If ActiveCell.Value < 10 Then
            MsgBox ("You are in Sheet1 and cell value is less than 10")
        Else
            MsgBox ("You are in Sheet1 and cell value is not less than 10")
        End If
    Else
        MsgBox ("Select Sheet1")
    End If
End Sub
 And see this.
Sub Test1()
If ActiveSheet.Name = "Sheet1" Then
If ActiveCell.Value < 10 Then
MsgBox ("You are in Sheet1 and cell value is less than 10")
Else
MsgBox ("You are in Sheet1 and cell value is not less than 10")
End If
Else
MsgBox ("Select Sheet1")
End If
End Sub
Which one is looking cool? Pressing Tab key will add indent to your code, repeated press will add more indent. You can use Shift+Tab to outdent (to remove indent).

If you select Auto Indent option, VBA auto indents the next line as per indent of previous line. You can turn this option on and off by clicking on Tools > Options > Editor tab > check or clear Auto Indent. You will also have option to enter what width your indent should have.

Think of All Possible Errors

Prevention is better than cure, right? Think of the errors that can occur while your code is used. These errors can be because of version compatibility, incorrect usage of syntax etc. If you see the possibilities, you can categorize those under 3 types.

Syntax Errors

Syntax error is where your code itself having errors. For example, you misspelled object’s name, one example could be, Application object is entered as Applicatoin (i and o have changed places). There is plethora of other scenarios where you err while coding. VBA highlights syntax errors with red colour and often with an alert message.

You can enable or disable auto syntax check by clicking on Tools > Options > Editor tab > check or clear Auto Syntax Check.

Runtime Errors

These are the errors that can occur while executing your macro. You will have to think of all the possible run time errors while coding. For example, if you are writing a code that enters some value in a cell, you will have to anticipate a situation where the sheet is protected and you will have to write code to have a workaround. Another example is, if your code is using a newly introduced object which was not available in earlier version of Excel, executing your code in other machines which uses older version will throw errors.

For run time errors, Excel displays an alert and stops executing the macro unless you provide a workaround in your code.

Logical Errors

These errors occur if you fail to draft your code logically. Logical errors may not stop macro execution all the times but will give incorrect results. For example; if you were to enter some value in currently selected cell of Sheet1 but you used ActiveCell object to do this, your macro will enter the values in currently selected cell of currently active sheet which might not be Sheet1.

Test and Retest Your Code

As a good developer always do, test and retest your macro every time you do a change to your code. Your testing should include all possible scenarios you can think of. Use VBAs debugger tool extensively for this purpose. There is a whole menu dedicated to debugging in VBA (look at Debug menu). We will see about each option available in this menu but in one of future posts.

Use Recorder

We saw about recording a macro in one of our previous posts. Use this feature and you will for sure get a way around the code. Though recorded code is not perfect, at least you get an idea on what object can be used.

Use Comments

While analysing our recorded code in our previous post, we saw that comments can be entered to clearly mention what the code is trying to do for someone looking at the code that could be even for writer of the code. Looking at a code I wrote 6 months ago makes no sense to me in terms of logic I used; comments in this situation will be a saviour. Go ahead and use comments extensively to brief about your code.

Keep it Simple Silly

If you are trying to achieve a mammoth task or various tasks, try to break your code into multiple modules, each module aimed at achieving something. Calling a macro within other macro is very easy. Your code looks less clumsy this way and it will be easier to find any errors.

Provide Error Trapping

Run time error causes the macro to stop executing. If you want your macro to run without interruption, you will code your macro to tell what to do if an error occurred. This is called errortrapping. You can do this by using statements like On Error Resume Next or On Error Goto. So, make provision for error trapping in your code.

Use Option Explicit

You can use variables in VBA to capture some values or facilitate looping (we will discuss all these as we proceed deeper). Though VBA facilitates variables usage without declaring them first, it is a good choice to declare all the variables explicitly. This not only makes your code run faster and memory saving but also saves for risk of misspelling.

Use Help

Last but not the least in anyway, use built-in help in any case you are in need of help. VBA help is documented in a fantastic way; you will probably get all that you need from here. Else, there is a fair chance that one of the online documents already has a solution for your problem.